Showing posts with label Redesign. Show all posts
Wednesday, September 12, 2012
Big Chair
This ended up being quite a different that what I originally had thought. The big chair was free (JIPPI). I knew I wanted a pink chair. So I bought some pink paint and pink fabric and did my thing.
Friday, August 3, 2012
Redesigned Frames
I had two boring white frames in my bedroom. They were boring. Too boring for my new bedroom. I decided to give them a make-over!
I started with the plain frame.
Then I added some washi tape around the frame. It fit perfectly. To get the nice corners, I just folded one of the tape pieces in a 45 degree angle and glued it on.
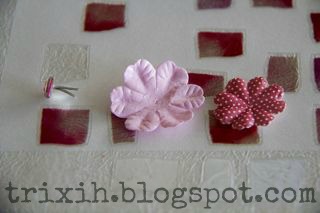
I thought it turned out great, but I was not done. I wanted some flowers. I took pre-cut paper flowers and secured then together with a gemstone pin.
Then I glued them in the bottom corner of my frame. I am so happy the way they turned out! I think they look absolutely amazing! And it took me under 30 minutes to make two.
Thursday, July 19, 2012
Spray Painted Basket
It was already 4.30pm and I wanted to do a quick project and something to get me going. I have had little energy today, most of which disappeared when out shopping fabric for my room.
The basket I got for free at a give-away hall by the local dump yard, where I earlier had found things like this. It was simple and looked fine, but I wanted it to be a bit more special. I went outside on the balcony and lay out an old bed sheet, which I use for painting on.
I started with a layer of spray paint.
Then I waited 2-3 minutes before I did a layer of blue spray paint. I had gotten this a few weeks ago for some lamps that will go in my bedroom.
I decided to do two layers 2.3 minutes later.
And then it was finished.
It is amazing how fast it went. And what a big difference. I am really starting to be a fan of spray paint! It went super fast, only having to wait 2-3 minutes between each layer. I really understand why so many bloggers swear to spray paint instead of normal paint.
Have you done any project using spray paint? I would LOVE to see, so please post a link in the comments so I can check it out!
Added to A Diamond In The Stuff and The CSI Project link parties.
Monday, June 4, 2012
Bedroom Reveal!
Before:
This is what I have been working on:
Cupboard
Shelving
Moulding
General Cleaning, Organizing and Tidying
Here is the final room.
Some close-ups:
I must admit one thing, I did think I would be satisfied keeping it the way it is now that it is all clean. But as I have done everything I have planned I am noticing that it is not the room I hopes it would be. I was prepared to be super excited of my new perfect room, but I am not. Of course I am very satisfied by how it turned out, but its just not done yet, so everyone can expect more projects from my bedroom when I can figure out what more this room needs.
I did find a chair today for free! at a a dump yard. I will have to buy some fabric and give it a small make-over. It is just going to be something in the meantime while I find something better suited. I am going to have it in the empty corner.
UPDATE: Bedroom Wall
This is what I have been working on:
Cupboard
Shelving
Moulding
General Cleaning, Organizing and Tidying
Here is the final room.
Some close-ups:
I must admit one thing, I did think I would be satisfied keeping it the way it is now that it is all clean. But as I have done everything I have planned I am noticing that it is not the room I hopes it would be. I was prepared to be super excited of my new perfect room, but I am not. Of course I am very satisfied by how it turned out, but its just not done yet, so everyone can expect more projects from my bedroom when I can figure out what more this room needs.
I did find a chair today for free! at a a dump yard. I will have to buy some fabric and give it a small make-over. It is just going to be something in the meantime while I find something better suited. I am going to have it in the empty corner.
UPDATE: Bedroom Wall
Wednesday, May 30, 2012
Cupboard Makeover
So the first project I am going to share with you today is a cupboard make-over I did back in September. I was really excited to start my first project on my new bedroom. I had not even painted the walls at this time. But I had decided I wanted the coffee latte/brown walls. From the paint samples I had collected I had found this really wonderful blue colour I wanted to use. The same colour I later used in my Chair Redesign in April. I did have one slight problem though, I did not yet have a piece of furniture. I went to two flea markets and found nothing.
The cupboard I eventually found, I got for free. Close to where I live we have a dump yard where there is also a give-away section. Here people can place old furniture and other stuff they no longer want, but is still in a somewhat good shape. I found my cupboard there. I thought it would have so much potential. So I took it home.
The first thing I did was removing the handles and everything, I put it in a box to keep it all together (though I do not think I will use any for this project) then I sanded it down. At this point I used some sandpaper and my hand. This process took a long time, which is why, after consulting with my dad I went shopping.
I got this is a Black and Decker and it costs $90. It is really effective, and the shape of the front makes it easy to get into corners. The holes where the handles had been I closed, knowing that I was going to get new knobs. I took a spatula and some wall paste and used this to fill the holes.
This is what it looked like after two coats of paint as well.
This is what it looked like half-done. I still had to spray paint the hinges and buy some knobs. This was before I had painted my walls as you can see the purple walls in the background.
And here is the final product. I personally LOVE it! The crystal knobs I bought on eBay.
Here are the before and after picture, what a difference!
The cupboard I eventually found, I got for free. Close to where I live we have a dump yard where there is also a give-away section. Here people can place old furniture and other stuff they no longer want, but is still in a somewhat good shape. I found my cupboard there. I thought it would have so much potential. So I took it home.
Before Pictures:
The first thing I did was removing the handles and everything, I put it in a box to keep it all together (though I do not think I will use any for this project) then I sanded it down. At this point I used some sandpaper and my hand. This process took a long time, which is why, after consulting with my dad I went shopping.
I got this is a Black and Decker and it costs $90. It is really effective, and the shape of the front makes it easy to get into corners. The holes where the handles had been I closed, knowing that I was going to get new knobs. I took a spatula and some wall paste and used this to fill the holes.
Then I did three coats of base coast in white, for the paint to sit better and longer, and two coats of paint. The paint I used is a light turquoise.
This is what it looked like after two coats of the base paint.
This is what it looked like after two coats of paint as well.
Then I painted inside, two coats of the base color and two coats of white paint. I used some left over white wall paint.
This is what it looked like half-done. I still had to spray paint the hinges and buy some knobs. This was before I had painted my walls as you can see the purple walls in the background.
And here is the final product. I personally LOVE it! The crystal knobs I bought on eBay.
Here are the before and after picture, what a difference!
Subscribe to:
Posts (Atom)